
Do you have your viewfinder built yet? A piece of overhead transparency or plexiglass that you have attached to some cardboard to make it stiffer.
Now is time to put it in practice. So you have a transparent page. Draw a line midway through the top with your permanent marker, to divide the top in half top and do the same to the other
Repeat those lines on your drawing pad, cut it in half to end up with 4 sections.
Pick something not too intricate for your drawing today. You could pick your hand if you're not sick of it yet, or another object,
If you choose your left hand, position the viewfinder on top of your hand which is turned over with the fingers facing up.
If you pick an object, place your viewfinder so that your object sits in the middle of the viewfinder.
Close one eye. (Not both!!!!) By closing one eye, you flatten the depth of field that is achieved with our two eyes seeing at the same time. It then becomes easier to render on a flat surface what you see with one eye, which tends to flatten what you see.
With a NON permanent marker, like a sharpie, start drawing ON the viewfinder. Draw what you see. Cheating? OK. Call it what you want, that's the exercise for today, lol.
Use the lines splitting the viewfinder to guide you to reproduce the SHAPES and angles that you see on the viewfinder. on your paper. Using your right mode of drawing, you are reproducing shapes and spaces as they appear in relation to the various lines through the viewfinder.
When your drawing ON the viewfinder is pretty close to your satisfaction, put the viewfinder next to your drawing pad, and reproduce the lines, shapes and angles from the viewfinder on your drawing pad, which is divided into the same lines as the viewfinder.
When you are finished, erase the middle lines on your drawing pad, and assess your drawing against the original.
Remember to date it, and post it on the 'sketchbook project' site.
If you have questions, contact me on imagine.her@gmail.com
Friday, January 15, 2010
Drawing on the right side of the brain - empty space
This next step is another form of contour drawing, but this time, you will look at your drawing.
It is common practice to choose a pair of shoes with laces for this exercise.
The idea is to imagine that the pair of shoes on your drawing table is bound by a square box. When you are drawing the outline of the shoes, you do so in relation to the square (or rectangle, of course). What you are drawing is not so much a pair of shoes (left brain activity) but rendering on paper the lines as they relate to the side of the box, and between each other.
That space between the laces is NOT a space between the laces, it becomes a rectangle, the laces are another rectangle. You make your drawing by defining the spaces BETWEEN the elements, and engage your right brain.
Seeing the spaces between the elements will help you have accurate proportions, even if you can't draw. That little space where the lace falls over the stripe on your shoe becomes a little triangle. It's easy to define its shape and size.
For the next exercise after you do the shoes, draw your non-drawing hand holding something intricate: a pair of scissors, a flower.
Your book offers more exercises to practice.
Remember to date your drawings.
For the next lesson, you will need to get some pieces of gear. You will need:
- a thick overhead transparency, or
- a very thin piece of plexiglass as can be found on picture frames,
- a permanent marker as used for writing on CDs
- and test another marker that will be erasable.
Have fun!
Monday, January 11, 2010
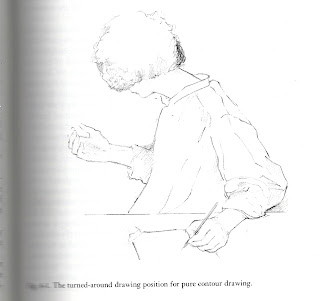
Drawing on the right side of the brain - pure contour drawing
Yes, pure contour drawing is HARD. Not so much in the doing, but in the letting go. Letting the left brain go. We have been educated and trained to favor the left brain: numbers, writing, organizing, being tidy, following rules.
In right brain drawing, there are no rules, no words, no plan to follow. The left brain hates that and will give you many reasons why you shouldn't do this exercise: it's stupid, dumb. My back hurts. It will look ugly. Drawing's not so important anyway. etc I'm sure you can add your own.
Pure contour drawing is where you have the most chance to experience then practice the shift from left brain processing to the right. The slowness of the drawing pushes the left brain deeper into silence, or 'off'.
Some people's left brain is determined to maintain control and avoid the fear of the unknown. You must reassure your left brain, talk to it. Really! As Betty Edwards writes on page 87: "Tell it you're not going to abandon it, that you're just going to try something."
Further, she writes: 'Make sure you don't permit your left brain to ridicule your contour drawing, saying critical things. Soon, we'll be putting everything together and your drawings will be better than ever.'
Another pure contour drawing you may try is something intricate: crumple up a piece of paper and draw the lines. Or draw your hand holding an intricate object. Put a pair of shoes with laces where you can see it and do a pure contour drawing.
Next, we will do a modified contour drawing, and this is where this current practice will pay off.
You do NOT have to post your pure contour drawings. They are YOUR marks, Betty Edwards calls it a visual representation of the insides of your right brain!
Friday, January 8, 2010
Drawing on the Right Side of the Brain, Contour Drawing
Oh, no, please not contour drawings!!!! Arggggh, terrifying, ugly contour drawings.
Ok, so some of you don't know what they are.
What they are is what most MOST artists used to loosen up before they start work. Play, draw.
What they do is practice engaging the right brain, and sending the left brain on a little job, like ... far away.
Here's what you do.
Tape your drawing paper on your table. Put your pencil at a starting point on a page. Then turn away from your paper. You will be drawing your hand. This is what it will look like, taken from your book.
 Draw your hand.
The point is not to draw pretty. Or to draw a likeness. the point is to draw the edges, to train your eye to SEE. Because you've never really looked.
Draw all the little details, the little wrinkles and folds. Get absorbed in your hand.
You are doing this very slowly. You can set a timer for at least 20 minutes. Move your eye slowly around your hand, the same speed you're drawing.
DO NOT LOOK AT THE PAPER UNTIL YOU'RE FINISHED..
You may be tempted too, or your left brain will trick you. But you'll ruin the practice and have to start over. So don't cheat.
Betty Edwards say this is THE MOST IMPORTANT EXERCISE in the entire course.
It will NOT look pretty. It WILL look like spaghetti soup. Or chicken scratchings. Except worse.
The whole point is to train your eye and your brain to SEE again, and to get your hand to do that.
I look forward to lots of noodle soup. 'tis the right season for it. Yummmm.
I love all those left-brainers saying: this is completely crazy. You can't learn to draw like this. This is for children.
Actually, children don't NEED this exercise, because they can still see. They don't have any preconceived idea or image of what a hand 'should' look like.
But I promise you that this exercise will lead you to start drawing amazing, realistic hands.
Off you go!
DRSOB viewfinder
In this lesson, we are going to make a viewfinder.
But first, I'd like to tell you a story. I'm sure you know what a viewfinder looks like, and you've probably seen artists use them in art school. They are this little cardboard cut out that allows you to see only a small part of the landscape or picture you want to draw. Most viewfinders also have a grid that allows you to reproduce proportions exactly.
When I was learning to paint with watercolors, a lifetime ago, we used a grid to reproduce the horse that was our model. I did a fantastic horse. Well, of course! I thought I was not drawing it, because I was using the grid.
"That's not drawing, that's cheating!" So that was the last of my self-directed attempts, since it wasn't really drawing, you know.
Well, guess what!!! It IS drawing!!! As I discovered 2 years ago. Yep, it took me that long.
Here's the story.
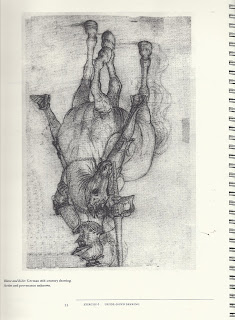
My great-grand uncle is Paul Chabas, who painted September Morning, displayed below.
 If you'd like to know more about the story and the scandal that surrounded this painting, it's available here: http://www.bullworks.net/ffg/sptmrn/sptmrn.html
By a strange twist of fate, my step-sister came by a lot of Paul Chabas drawings and study photos. And what did she find as well?
Something particularly rare and precious: this photographic study of a young lady posing for the painting. How cool is that! (No, we don't know who she is.)
 But then, look at what else we have:
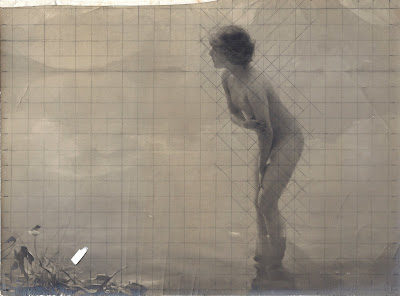
A grid on a photographed study of the painting!!!!
He made a small study, then used a grid to enlarge it to its final size (which is something quite large). And the man belongs to the Academie Francaise, which is the most prestigious art institution in France!!!! So I guess it's ok to use a viewfinder and a grid, to reproduce the world!
So today we are going to build a viewfinder. For the grid, it's easier to use a sheet of transparency paper, something reasonably light, because some of the exercises will require that you balance it on top of your fingers for a while.
You can set the transparency or plexiglass ion a piece of cardboard and glue it to give it rigidity.
You will want to make several at once as you'll be finding this device very useful. Here's the reason why. You will be drawing some sketch marks ON the transparency, and erase them. So if you have several, you'll have a few spares once the first one gets all smeared.
For the grid's lines, you want to use a permanent marker. Draw a box on your page that measures 6.5 by 8.
Divide it in half vertically and horizontally.
Next, we will use the viewfinder to frame your drawings to make them easier to transfer and more accurate.
But first, I'd like to tell you a story. I'm sure you know what a viewfinder looks like, and you've probably seen artists use them in art school. They are this little cardboard cut out that allows you to see only a small part of the landscape or picture you want to draw. Most viewfinders also have a grid that allows you to reproduce proportions exactly.
When I was learning to paint with watercolors, a lifetime ago, we used a grid to reproduce the horse that was our model. I did a fantastic horse. Well, of course! I thought I was not drawing it, because I was using the grid.
"That's not drawing, that's cheating!" So that was the last of my self-directed attempts, since it wasn't really drawing, you know.
Well, guess what!!! It IS drawing!!! As I discovered 2 years ago. Yep, it took me that long.
Here's the story.
My great-grand uncle is Paul Chabas, who painted September Morning, displayed below.
 If you'd like to know more about the story and the scandal that surrounded this painting, it's available here: http://www.bullworks.net/ffg/sptmrn/sptmrn.html
By a strange twist of fate, my step-sister came by a lot of Paul Chabas drawings and study photos. And what did she find as well?
Something particularly rare and precious: this photographic study of a young lady posing for the painting. How cool is that! (No, we don't know who she is.)
 But then, look at what else we have:
A grid on a photographed study of the painting!!!!
He made a small study, then used a grid to enlarge it to its final size (which is something quite large). And the man belongs to the Academie Francaise, which is the most prestigious art institution in France!!!! So I guess it's ok to use a viewfinder and a grid, to reproduce the world!
So today we are going to build a viewfinder. For the grid, it's easier to use a sheet of transparency paper, something reasonably light, because some of the exercises will require that you balance it on top of your fingers for a while.
You can set the transparency or plexiglass ion a piece of cardboard and glue it to give it rigidity.
You will want to make several at once as you'll be finding this device very useful. Here's the reason why. You will be drawing some sketch marks ON the transparency, and erase them. So if you have several, you'll have a few spares once the first one gets all smeared.
For the grid's lines, you want to use a permanent marker. Draw a box on your page that measures 6.5 by 8.
Divide it in half vertically and horizontally.
Next, we will use the viewfinder to frame your drawings to make them easier to transfer and more accurate.
Wednesday, January 6, 2010
Do I have a little present for you!!!!
Here comes compliment of Vicki Holdwick, who posted it on her blog.
This is a little diversion, to take your right brain on a little journey and give your left brain a pat on the back.
This is NOT part of the course, and you certainly don`t have to watch the video or do the exercise. It`s just a little present from the teacher, only 5 minutes and great fun results for you:
I`m off to go make one.
Monday, January 4, 2010
Upside down drawings in Drawing on the Right side of the Brain
In the workbook, Betty Edwards offers 3 more drawings that you can choose from for your upside down exercise.
I reproduce them here, so that you have more choice.
You can do one, or you can do them all over a few days. It`s excellent practice. Of course, like the other drawing, you will draw this one upside down.
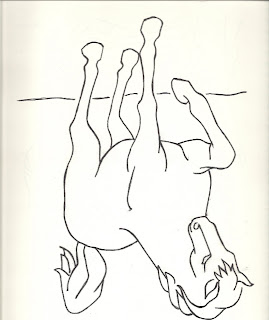
After you finish your drawing, note the`state`you were in while drawing: no naming of parts, but looking at forms, at shapes. Looking at how this line intersect that line.
What you are doing is learning to `see`again. You are learning the relation of lines. You are learning to see EDGES.
Betty Edwards explains in her more recent versions of her book that she finally understood that drawing is seeing.
And it`s about seeing:
- edges
- shapes
- relationships
- lights and shadows
- perception of the whole.
This is what you are now doing...
Remember to post your work on your blog or the sketchbook folder and to date it.
I reproduce them here, so that you have more choice.
You can do one, or you can do them all over a few days. It`s excellent practice. Of course, like the other drawing, you will draw this one upside down.


After you finish your drawing, note the`state`you were in while drawing: no naming of parts, but looking at forms, at shapes. Looking at how this line intersect that line.
What you are doing is learning to `see`again. You are learning the relation of lines. You are learning to see EDGES.
Betty Edwards explains in her more recent versions of her book that she finally understood that drawing is seeing.
And it`s about seeing:
- edges
- shapes
- relationships
- lights and shadows
- perception of the whole.
This is what you are now doing...
Remember to post your work on your blog or the sketchbook folder and to date it.
A vase and Igor Stravinsky
Today, we start the Right brain part of the course. Yeah!!!! It`s the most fun!!!!
You will have read in your book all the discussions about the right brain, which is the creative part, the one that recognizes faces and shapes, enjoys music and pictures, but has no words, no critic, no analytical tools.
You`ll find with these exercises a way to become familiar with what Right brain activity looks like. It is a wonderful place, where there is no time, complete silence within. I call it meditation. Hours of no internal dialogue, no inner critic. Silence.
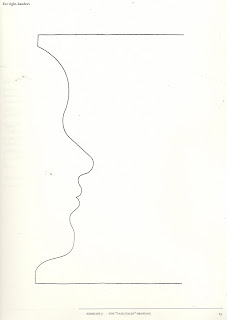
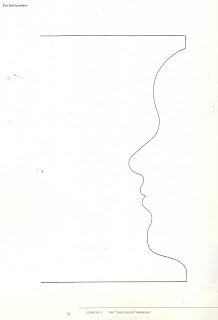
Here`s our first exercise. Download the picture below and make several copies. Note that there is a drawing for RIGHT handers and one for LEFT handers. You know who you are.
The idea, as you may have seen in your book, is to draw the mirror image of the profile, and complete the picture so that it looks like a vase, the side you draw identical to the model.
Print several copies of the drawing that applies to you, so you can do this drawing several times. You`ll improve as you go, but more importantly, you`ll start training your left brain to get out of the way, that the situation is under control, and that it can go for a hike.
Here`s the RIGHT HANDER`S sketch.
And here is the LEFT HANDER sketch:
After this drawing, you can create one yourself. On the left side if you`re right handed, draw the face of a monster: warts, crocked nose, curved chin, etc. Then draw the line at the top and the line at the bottom, and this time, replicate THAT FACE!!!! I`d love to see those drawings!!!!
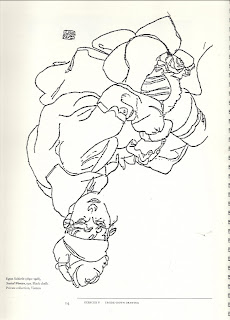
After you finish these two drawings, here`s another WONDERFUL one. I love this one. I`ve used the format to create drawings that I was unable to replicate because of the LEFT brain.
Briefly, the idea is that you copy a drawing upside down, so that you don`t recognize the parts of the body you`re drawing, saying, with the left brain, this is a sleeve, this is a chair, etc.
The drawing is in your book. I`ll not replicate it. It is a drawing by Picasso, called Portrait of Igor Stravinsky. In my 1989 book, it`s on page 52. I know it`s available in all the books.
It might take you up to an hour to do this drawing. It is incredibly relaxing and soothing.
Just draw the lines in relation to each other, and to the margins of the book, and your paper. Take a full size sheet for this drawing, and take your time. But do it all in one sitting. Or as much as you can in one sitting.
Then date it.
Enjoy!
You will have read in your book all the discussions about the right brain, which is the creative part, the one that recognizes faces and shapes, enjoys music and pictures, but has no words, no critic, no analytical tools.
You`ll find with these exercises a way to become familiar with what Right brain activity looks like. It is a wonderful place, where there is no time, complete silence within. I call it meditation. Hours of no internal dialogue, no inner critic. Silence.
Here`s our first exercise. Download the picture below and make several copies. Note that there is a drawing for RIGHT handers and one for LEFT handers. You know who you are.
The idea, as you may have seen in your book, is to draw the mirror image of the profile, and complete the picture so that it looks like a vase, the side you draw identical to the model.
Print several copies of the drawing that applies to you, so you can do this drawing several times. You`ll improve as you go, but more importantly, you`ll start training your left brain to get out of the way, that the situation is under control, and that it can go for a hike.
Here`s the RIGHT HANDER`S sketch.

And here is the LEFT HANDER sketch:

After this drawing, you can create one yourself. On the left side if you`re right handed, draw the face of a monster: warts, crocked nose, curved chin, etc. Then draw the line at the top and the line at the bottom, and this time, replicate THAT FACE!!!! I`d love to see those drawings!!!!
After you finish these two drawings, here`s another WONDERFUL one. I love this one. I`ve used the format to create drawings that I was unable to replicate because of the LEFT brain.
Briefly, the idea is that you copy a drawing upside down, so that you don`t recognize the parts of the body you`re drawing, saying, with the left brain, this is a sleeve, this is a chair, etc.
The drawing is in your book. I`ll not replicate it. It is a drawing by Picasso, called Portrait of Igor Stravinsky. In my 1989 book, it`s on page 52. I know it`s available in all the books.
It might take you up to an hour to do this drawing. It is incredibly relaxing and soothing.
Just draw the lines in relation to each other, and to the margins of the book, and your paper. Take a full size sheet for this drawing, and take your time. But do it all in one sitting. Or as much as you can in one sitting.
Then date it.
Enjoy!
Sunday, January 3, 2010
Portrait
My doubting students wanted to see a portrait that I have done.... Which is not fair to them, since I have already taken the course. It was 15 years ago, which means that I`ve had lots of practice.
So here she is.... this summer. It took about 4 hours to draw this puppy. Which is why I don`t do it much these days. I used a graphite pen, I`m not sure what the difference is in construction with the regular pencils, bu

So here she is.... this summer. It took about 4 hours to draw this puppy. Which is why I don`t do it much these days. I used a graphite pen, I`m not sure what the difference is in construction with the regular pencils, bu

Drawing on the right side of the brain - self-portrait
The second step to the progression of this class is to make a portrait of yourself.
WHAT!!!! Forget it, I`m not doing a portrait. No, no, no!!!!
I hear you!!!
You don`t have to show that portrait to anyone. You don`t even have to do it in your sketch book if you want, you can do it on a loose leaf of paper and go hide it somewhere. But make sure you date it first.
Here`s how you do it. Find a mirror to prop on your desk or table. Find a comfortable angle and.... draw away.
Again, we`re using the drawing as a marker of your progress.
I a few weeks time, you`ll be happy to know where you started.
So get your HB pencil, your mirror, get comfortable and draw your face.
Date your portrait.
After this step, we start getting into the `meat` of it and start following her techniques. I`ll post the next class midweek, since some of you are so excited to get going.
Till then, you may want to read the introduction to the book, where she discusses the Right and Left brain specialization. Not essential for the course at this stage.. Just helpful. And it IS called Drawing on the RIGHT side of the brain, but you`ve probably heard a lot about that in recent years.
See you again Wednesday.
You can post your drawing on your blog and leave a comment here, or in the Sketchbook project folder for our drawings.
Subscribe to:
Comments (Atom)

